

Introduction
Whether you’ve enlisted professional help or you want to paint your home as a DIY project, painting your walls can be a rewarding project that transforms the look and feel of your home. A fresh coat of paint can breathe new life into a room, making it brighter, more inviting, and most importantly, visually appealing. However, achieving that perfect, flawless finish isn’t always as easy as it seems. Many homeowners encounter common wall painting mistakes that can lead to frustration and undesired results. In this blog, let’s explore 15 wall painting mistakes you should avoid, along with detailed explanations and practical tips on how to fix wall painting mistakes. Whether you’re a seasoned DIYer or a first-time painter, this detailed guide will help you achieve a professional-looking finish for your walls.
- Neglecting Surface Preparation
Mistake: Not focusing on surface preparation.
Explanation: Surface preparation is the first step for a successful paint job. Skipping this step can lead to issues like poor paint adhesion, uneven texture, and visible imperfections.
Fix: Before you begin painting, ensure your walls are clean, dry, and free of dust, dirt, and grease. Patch any holes or cracks with suitable fillers and sand the surface for a smooth finish. Consider using a primer to promote paint adhesion, especially on porous or previously painted surfaces.
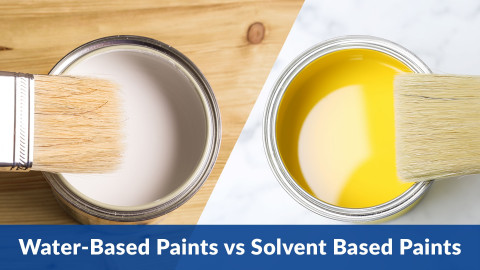
2. Choosing the Wrong Paint
Mistake: Using the wrong type of paint for the room’s surface.
Explanation: Different types of surfaces and rooms require specific types of paint. Using the wrong paint can lead to premature fading of the paint and poor coverage of the paint on the wall.
Fix: Select the appropriate paint type. Consider factors like humidity, traffic, and the room’s intended purpose when choosing the finish (e.g., matte, satin, or semi-gloss). For high-moisture areas like bathrooms, it’s best to use mold-resistant paints
3. Inadequate Color Testing
Mistake: Not testing paint colors before committing to a full application of the color.
Explanation: Paint colors can appear different in your space due to lighting and existing decor. Skipping color testing can result in an undesirable final look.
Fix: Always test paint colors on a small section of your wall to see how they look in specific lighting conditions that may prevail in the longer run. Observe how the color changes throughout the day. This can prevent an unwanted color surprise after you’ve painted the entire room
4. Insufficient Paint Quantity
Mistake: Not calculating the amount of paint needed for the project.
Explanation: Running out of paint mid-project can lead to color inconsistencies and unnecessary frustration.
Fix: Measure your walls’ square footage and consult the paint can’s coverage information to determine how many cans you need. It’s better to have extra paint for touch-ups than to run out in the middle of the job. If in doubt, just consult an expert and they can often guide you on how to fix wall painting mistakes.
5. Poor Taping and Edging
Mistake: Neglecting proper taping and edging techniques, resulting in uneven lines and paint bleeding.
Explanation: Uneven lines and paint bleeding onto adjacent surfaces can make your overall finish look odd and sloppy.
Fix: Invest in quality painter’s tape and take your time to tape off the edges neatly. Make sure the painter’s tape is firmly pressed to prevent the paint from seeping underneath. Remove the tape while the paint is still wet for clean lines.
6. Rushing the Job
Mistake: Painting too quickly, leading to uneven coverage and missed spots.
Explanation: Rushing the painting process can result in uneven texture, streaks, and inconsistent color.
Fix: Take your time, apply the paint evenly, and use long, steady strokes. Ensure each coat is completely dry before applying the next. Patient, methodical painting yields better results.
7. Overloading the Brush or Roller
Mistake: Overloading your brush or roller with paint causes drips and uneven application.
Explanation: Excess paint on your tools can lead to unnecessary dripping, uneven coverage, and visible brush or roller marks.
Fix: Dip your brush or roller about a third of the way into the paint and drain off the excess on the rim of the paint can. This will prevent drips and result in a smoother coverage of paint.
8. Ignoring Ventilation
Mistake: Painting in poorly ventilated areas, leads to inhalation of harmful fumes and odors.
Explanation: Painting in Inadequate ventilation can cause discomfort due to paint fumes and slow drying times.
Fix: Open windows and doors for proper ventilation. Consider using low-VOC or VOC-free paints, which are less harmful to our health. If you’re painting in a confined space, ensure that you wear a respirator mask for your safety.
9. Painting in the Wrong Order
Mistake: Painting the ceiling after the walls, causing drips and uneven lines.
Explanation: Painting the ceiling after the walls can lead to paint drips and uneven lines where the two surfaces meet.
Fix: To avoid this dripping and seepage, start with the ceiling, and then move to the walls. This way, any drips from the ceiling can be easily covered when you paint the walls. Use an extension pole to reach high ceiling areas comfortably.
10. Not Mixing Paint Thoroughly
Mistake: Failing to mix the paint well enough, resulting in inconsistent color.
Explanation: Paint pigments can settle over time, leading to color discrepancies if not mixed properly.
Fix: Mix your paint thoroughly before and during the painting process. Use a stirring stick or a paint mixer attachment for a drill. This ensures a consistent color throughout the whole process.
11. Not Paying Attention to Repairs
Mistake: Painting over damaged walls without addressing the cause of it or other underlying issues.
Explanation: Painting over damaged surfaces can lead to further deterioration and visible imperfections.
Fix: Fix any structural or moisture-related problems before painting. Repair cracks, leaks, and damaged walls to ensure a smooth and long-lasting finish.
12. Applying Too Many Coats at Once
Mistake: Applying multiple thick coats of paint without allowing proper drying time.
Explanation: Applying too many coats without sufficient drying time can result in a shoddy, uneven finish.
Fix: Follow the recommended drying times between coats as indicated on the paint can. This prevents the paint from becoming too thick and ensures a smooth, even coat.
13. Painting Over Wallpaper
Mistake: Painting over wallpaper without proper removal or priming.
Explanation: Painting over wallpaper can lead to a subpar finish, as paint may not adhere well to the paper surface.
Fix: Remove the wallpaper completely wherever possible. If such removal isn’t feasible, use a high-quality wallpaper primer to ensure the paint adheres properly. Apply a thin coat of primer and allow it to dry completely before painting.
14. Using the Wrong Tools
Mistake: Using low-quality brushes or rollers that leave behind streaks and bristles.
Explanation: Cheap or worn-out tools can result in a less-than-smooth finish with visible brush or roller marks.
Fix: Invest in high-quality brushes and rollers that goes well with your paint type and the finish you’ve envisioned for the wall. Using quality tools will hold more paint, provide better control, and result in a smoother application. Overall, it just lends a much more elegant look to the surface.
15. Neglecting Cleanup
Mistake: Failing to clean your brushes, rollers, and other tools properly after each use.
Explanation: Neglecting cleanup can shorten the lifespan of your tools and make future painting jobs more challenging.
Fix: Clean your painting tools thoroughly with water or the recommended solvent for the type of paint you use. Proper cleaning of the tools prolongs their lifespan and ensures they’re ready for your next project.
FREQUENTLY ASKED QUESTIONS:
Is there a wrong way to paint a wall?
Yes, there are many wrong ways to paint a wall, from skipping surface preparation to using the wrong tools or paint type. It’s essential to follow proper painting techniques for a flawless finish.
Why is my wall patchy after painting?
Patchy walls can result from inadequate surface preparation, uneven paint application, or using old or low-quality paint. Properly preparing the surface and applying paint evenly can help prevent patchiness.
What are the painting rules for walls?
The key “rules” for successful wall painting include thorough surface preparation, choosing the right paint type and color, using quality tools, applying paint evenly, and allowing sufficient drying time between coats.
What can go wrong with painting?
Many things can go wrong with painting, including uneven coverage, drips, color discrepancies, and poor adhesion. These issues can often be avoided by following proper painting techniques and preparation.
In Conclusion
In conclusion, achieving a flawless finish when painting your walls requires attention to detail and avoiding common mistakes. By following the tips provided and addressing any issues promptly, you can transform your living space into a beautifully painted and inviting environment. Remember that the choice of paint, tools, and techniques plays a significant role in the final result, so invest in quality materials and take your time to ensure a job well done. Happy painting.

